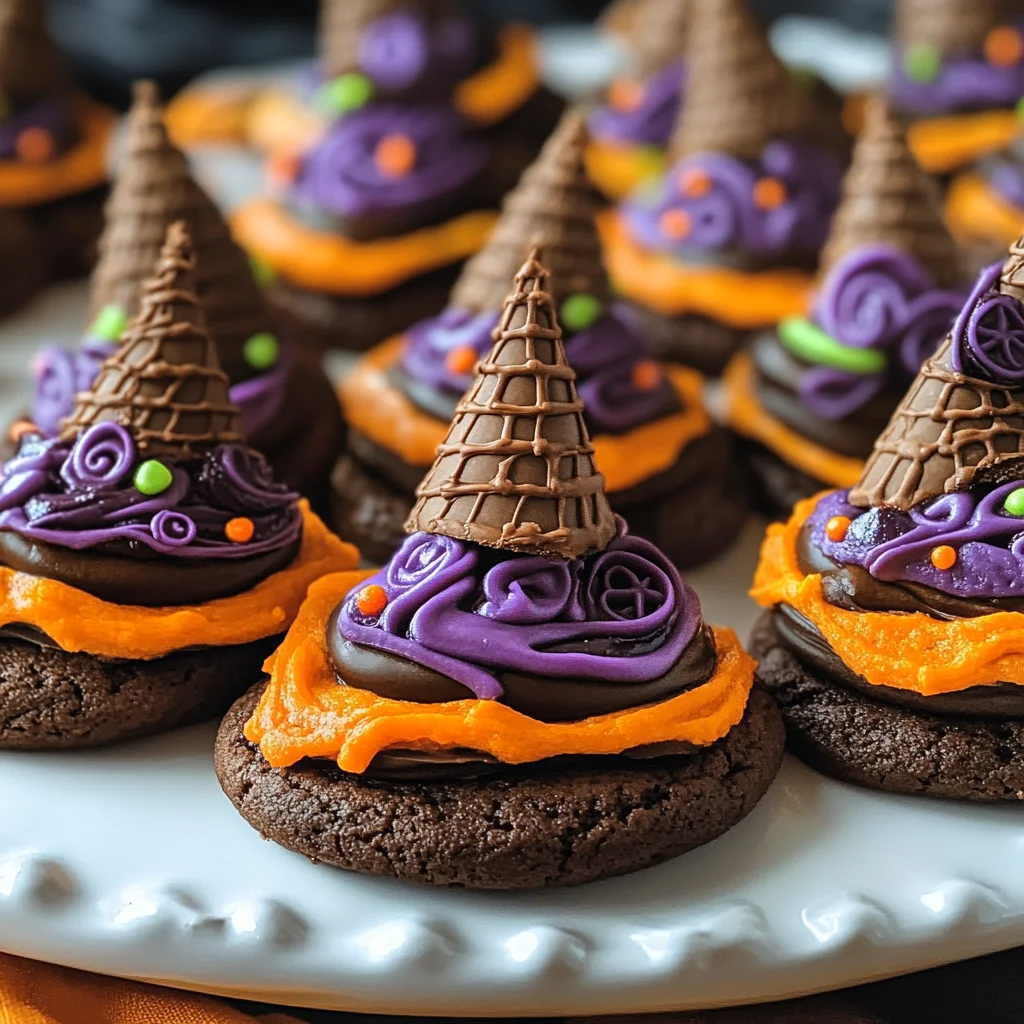
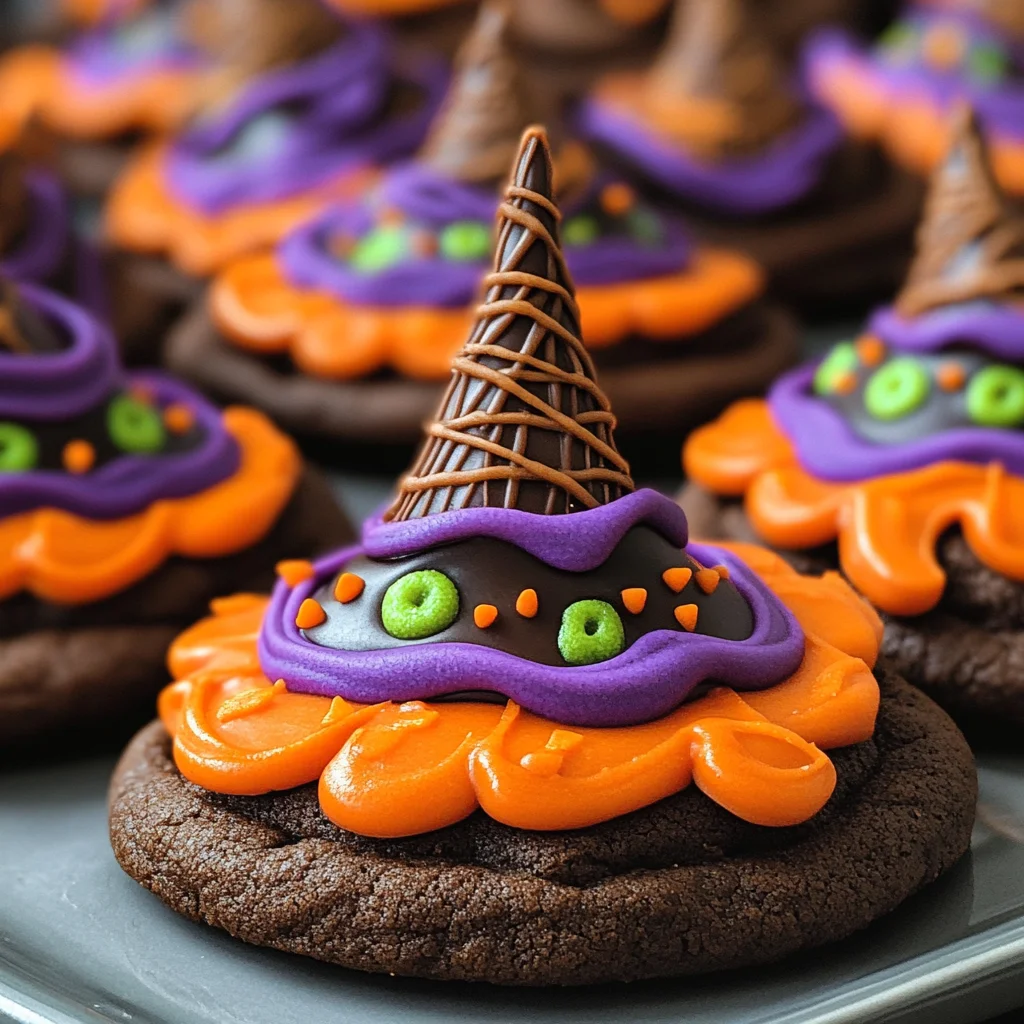
Halloween Witch Hat Cookies
These Halloween Witch Hat Cookies are the perfect treat to impress Halloween party guests. They are a fun project to do with kids, allowing for creativity and customization. With their chocolaty flavor and festive design, these cookies are sure to be a hit at any Halloween gathering!
Why You’ll Love This Recipe
- Fun for All Ages: This recipe is great for both kids and adults, making it a perfect family activity.
- Creative Customization: Use different colors and designs to make each witch hat unique.
- Delicious Flavor: The combination of cake mix and chocolate cookies creates a delightful taste that everyone will love.
- Eye-Catching Presentation: These cookies look impressive, making them ideal for parties or gatherings.
- Easy to Follow: Simple steps ensure that even beginners can create these charming treats.
Tools and Preparation
Before you start making your Halloween Witch Hat Cookies, gather the necessary tools to ensure a smooth baking experience.
Essential Tools and Equipment
- Cupcake Cones Baking Rack
- Cookie Sheet
- Parchment Paper
- Decorating Bags
- Spatula
- Knife
Importance of Each Tool
- Cupcake Cones Baking Rack: This rack helps secure the sugar cones while baking, ensuring they hold their shape.
- Decorating Bags: Using decorating bags makes piping icing easy and precise, allowing for better designs on your cookies.
Ingredients
For the Cake Mix
- Favorite Cake Mix or try Wilton’s Chocolate Cake Recipe
For the Cookies
- Store Bought Chocolate Cookies or try this recipe from Wilton
For the Icing Colors
- Lemon Yellow Icing Color
- Black Color Mist Food Coloring Spray
- Rose Icing Colors Pink Food Coloring
- Violet Icing Color, Gel Food Coloring
- Golden Yellow Icing Color
- Orange Icing Color
For Assembly
- Sugar Cones
- Creamy White Decorator Icing, 4 lb. Tub
How to Make Halloween Witch Hat Cookies
Step 1: Prepare & Bake the Cones
- Prepare the cake mix following your chosen recipe’s instructions.
- Place the Cupcake Cones Baking Rack on a cookie sheet.
- Insert the sugar cones into the rack.
- Fill each cone with 2 tablespoons of cake batter.
- Bake according to the timing instructions of your chosen recipe. Let cool.
Step 2: Spray the Cones
- If needed, trim any risen cake from the top of each cone using a knife.
- Place cones wide side down on parchment paper.
- Using Black Color Mist, spray the cones until fully coated.
- Allow them to dry for about 10 to 15 minutes.
Step 3: Tint the Icing & Prepare the Bags
- Tint 1 cup of creamy white decorator icing orange using orange food coloring.
- Combine violet and rose icing colors to tint another cup purple.
- Prepare two decorating bags with tip 2B; fill one with orange icing and another with purple icing.
- Tint ¼ cup of creamy white decorator icing yellow by mixing golden yellow and lemon yellow colors; place in a bag with tip 3 attached.
Step 4: Assemble the Witch Hats
- Pipe a small amount of orange icing in the center of a chocolate cookie; place a cone on top.
- With tip facing outwards, pipe a band around the wide end of half of the cones; smooth out with a spatula.
- Repeat this process using purple icing on the remaining cookies and cones.
- Let set for about 15 to 20 minutes before piping yellow icing around each hat’s band as a buckle.
- Allow final assembly to set for another 15 to 20 minutes before serving and enjoying!
How to Serve Halloween Witch Hat Cookies
These Halloween Witch Hat Cookies are a delightful treat that can be served in various ways to make your Halloween gathering extra special. Whether you’re hosting a spooky party or enjoying a cozy night in, here are some fun serving suggestions.
Creative Presentation Ideas
- Arrange on a spooky platter – Use a black or orange plate to create an eye-catching display.
- Add themed decorations – Surround the cookies with mini pumpkins or fake spiders for an extra festive touch.
- Include serving utensils – Provide fun Halloween-themed tongs or spoons for guests to help themselves.
Pair with Drinks
- Serve with hot chocolate – The warmth of hot cocoa pairs perfectly with the chocolaty flavors of the cookies.
- Offer apple cider – A classic fall beverage that complements the sweetness of the cookies.
- Create a dessert bar – Set up a DIY bar with various toppings and drinks for guests to customize their treats.
Fun Serving for Kids
- Create cookie decorating stations – Let kids add their own toppings and designs to make it interactive.
- Use cupcake stands – Present the cookies on tiered stands for a whimsical look that draws children in.
How to Perfect Halloween Witch Hat Cookies
To ensure your Halloween Witch Hat Cookies turn out perfectly, consider these helpful tips.
- Use fresh ingredients – Fresh cake mix and icing colors will yield better flavor and appearance.
- Pipe carefully – Take your time when piping icing to achieve clean and defined lines on the hats.
- Let layers set – Allow each layer of icing to set before adding more details to prevent smudging.
- Experiment with colors – Don’t hesitate to mix your own shades for unique hat designs that stand out.
Best Side Dishes for Halloween Witch Hat Cookies
Complement your Halloween Witch Hat Cookies with these delightful side dishes that are sure to impress your guests.
- Pumpkin Soup – A warm blend of pureed pumpkin with spices, perfect for fall gatherings.
- Spooky Veggie Platter – Carrots, cucumbers, and bell peppers arranged like a haunted scene; serve with hummus.
- Ghostly Fruit Skewers – Thread fruit like bananas and grapes onto skewers, topped with ghostly faces made from yogurt.
- Witch’s Brew Punch – A refreshing mix of lemon-lime soda and lime sherbet for a sparkling drink option.
- Mummy Dogs – Hot dogs wrapped in crescent roll dough, baked until golden brown, and served as little mummies!
- Monster Cheese Platter – An assortment of cheeses served with crackers, decorated with olives as monster eyes.
Common Mistakes to Avoid
Making Halloween Witch Hat Cookies can be a delightful experience, but it’s easy to make mistakes. Here are some common pitfalls to avoid.
- Not preparing enough icing – Ensure you prepare enough icing for decorating. Running out mid-decorating can lead to uneven results.
- Skipping the cooling step – Allow your baked cones to cool completely before decorating. This prevents the icing from melting and losing shape.
- Over-spraying the cones – When using Black Color Mist, spray too much at once. A light, even coat is best for achieving the desired color without drips.
- Ignoring the setting time – After assembling your witch hats, let them set for at least 15-20 minutes. This keeps everything in place and helps the decorations adhere properly.
- Not customizing colors – Feel free to mix and match icing colors beyond what’s suggested. Personalizing your cookies adds uniqueness that everyone will love.
Storage & Reheating Instructions
Refrigerator Storage
- Store cookies in an airtight container to keep them fresh for up to 5 days.
- Place parchment paper between layers if stacking to prevent sticking.
Freezing Halloween Witch Hat Cookies
- Freeze assembled cookies in a single layer on a baking sheet before transferring them to an airtight container.
- They can be stored in the freezer for up to 3 months.
Reheating Halloween Witch Hat Cookies
- Oven – Preheat to 350°F (175°C), then warm cookies on a baking sheet for about 5-7 minutes.
- Microwave – Heat individual cookies for about 10-15 seconds until just warm. Don’t overheat.
- Stovetop – Use a non-stick skillet on low heat for about 2 minutes; cover with a lid to retain moisture.
Frequently Asked Questions
Here are some common questions about Halloween Witch Hat Cookies.
How can I customize my Halloween Witch Hat Cookies?
You can customize your cookies by using different colors or adding edible glitter. Experiment with various toppings like sprinkles or candy eyes.
Can I use homemade cake mix instead of store-bought?
Absolutely! Using homemade cake mix allows you to control ingredients and flavors, enhancing the overall taste of your Halloween Witch Hat Cookies.
What can I use if I don’t have decorator icing?
If you don’t have decorator icing, you can use store-bought frosting or make a simple buttercream as an alternative for decorating.
How long do these cookies last?
Halloween Witch Hat Cookies typically last about 5 days when stored properly in an airtight container at room temperature.
Can I make these cookies ahead of time?
Yes! You can bake the cookie bases and store them in an airtight container a few days before decorating. Just wait until you’re ready to decorate before adding any icing.
Final Thoughts
These Halloween Witch Hat Cookies are not just fun; they’re also versatile! With endless possibilities for customization, they make great treats for any festive occasion. Gather your friends or family for a delightful baking session, and enjoy creating spooky treats that everyone will love!
Halloween Witch Hat Cookies

Create fun and festive Halloween Witch Hat Cookies that impress guests! Try this easy recipe today and bring joy to your celebration!
- Prep Time: 30 minutes
- Cook Time: 20 minutes
- Total Time: 50 minutes
- Yield: Approximately 12 servings
- Category: Dessert
- Method: Baking
- Cuisine: American
Ingredients
- Favorite Cake Mix or Wilton’s Chocolate Cake Recipe
- Store Bought Chocolate Cookies or Wilton's recipe
- Sugar Cones
- Creamy White Decorator Icing
- Lemon Yellow Icing Color
- Black Color Mist Food Coloring Spray
- Rose Icing Colors Pink Food Coloring
- Violet Icing Color, Gel Food Coloring
- Golden Yellow Icing Color
- Orange Icing Color
Instructions
- Prepare your cake mix according to package instructions.
- Insert sugar cones into a cupcake cone rack on a cookie sheet and fill each with cake batter. Bake until cooked through and cool completely.
- Spray cooled cones with black color mist until fully coated; allow drying time.
- Tint the decorator icing with various colors for decorating; prepare piping bags.
- Assemble cookies by piping icing onto chocolate cookies and attaching the cones as witch hats.
Nutrition
- Serving Size: 1 cookie (45g)
- Calories: 180
- Sugar: 12g
- Sodium: 120mg
- Fat: 8g
- Saturated Fat: 3g
- Unsaturated Fat: 4g
- Trans Fat: 0g
- Carbohydrates: 26g
- Fiber: 1g
- Protein: 2g
- Cholesterol: 15mg